If you were on the Internet today, you saw that Facebook released their Timeline profile to everyone. While you may have some sort of opinion about the Timeline, it’s here. There are a lot of really cool features and customizing you may want to get the hang of before it’s forced on you and you are playing catch-up.
There are actually a few cool things about this update. It is not only on desktop, it is also on mobile too. But before we get a head of ourselves, we need to activate your Timeline.
ACTIVATING FACEBOOK TIMELINE :
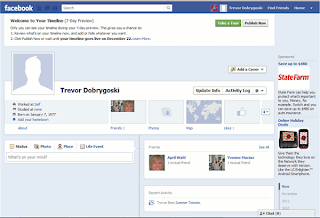
Click on the link in the bottom left of the Page as shown in below screenshot :

Once you activate the Timeline, your page will refresh. You will need to click on your profile to see the major changes.
HOW TO START :
Just go through the tour. It will give you a good knowledge regarding Timeline. You will get an idea of how to add new pictures in Cover Page.
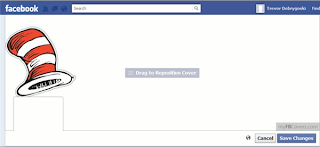
WHAT IS A COVER PAGE :
Timeline Cover Page is something like a background image in Twitter and Myspace. Only difference is, the cover is the header for your page. Your profile picture will appear in the bottom left corner. There are some people who are already crafting some really creative covers. Follow these two sites if u want to experienced the timeline in a different way.
- Click Here for Facebook Profile Covers
- Click Here for Facebook Cover Pix
Below is the Screenshot of a Cover Page, How it looks.

HOW TO ADD A COVER :
Depending upon you, you can use a cover from a site or your own pictures. You will need to click on the Add a Cover link in the top right of your profile header.

You will just need to select the picture, either by uploading it or you can use your photo library of your Facebook.

Once you have the picture ready and selected, you will need to drag it into the correct location. If you are doing something more creative, this will make it easier to make a fun cover.
HOW TO USE TIMELINE :
You already got some idea about your profile page to see how the Timeline looks like. It looks totally different !!! Well you or your friends can skip through your past updates. On the right side you will see a little timeline. You can use this to skip through your Facebook past.

When you click on a month or a year, you can see the highlights for that time.
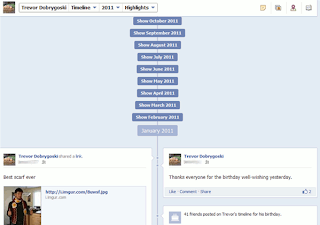
You can also see all of the posts from your past by clicking the drop down menu.

HOW TO PROMOTE OR HIDE YOUR OLD POSTS :
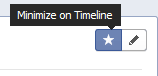
There are always pictures or things in your updates that you don't want to relive or show off . If you want to hide these posts from the timeline, there is a pencil icon next to each post in your timeline, if you click on it, you are given the option to hide it or even change the date.

If you would like to promote an update you are proud of, you can click the star, this will stretch the post across the full length of the timeline. If you click the star again, you will minimize again.
PRIVACY SETTINGS :
There is an option in the privacy setting tab to limit what the public and friends of friends can see. You can change this if you are not comfortable with people Facebook stalking you.

Hope you like this tutorial of Facebook Timeline. Plz pass on comments if you are facing any problems.
Don't forget to share this.
Any feedback, questions or ideas are always welcome. In case you are posting Code ,then first escape it using Postify and then paste it in the comments
0 comments: